Viewer:三维场景的“外壳”
Viewer 是 Cesium 的核心容器,作为 Cesium 应用入口,封装了场景渲染、相机控制、用户交互、数据管理等核心功能,是构建 Cesium 应用的基础。
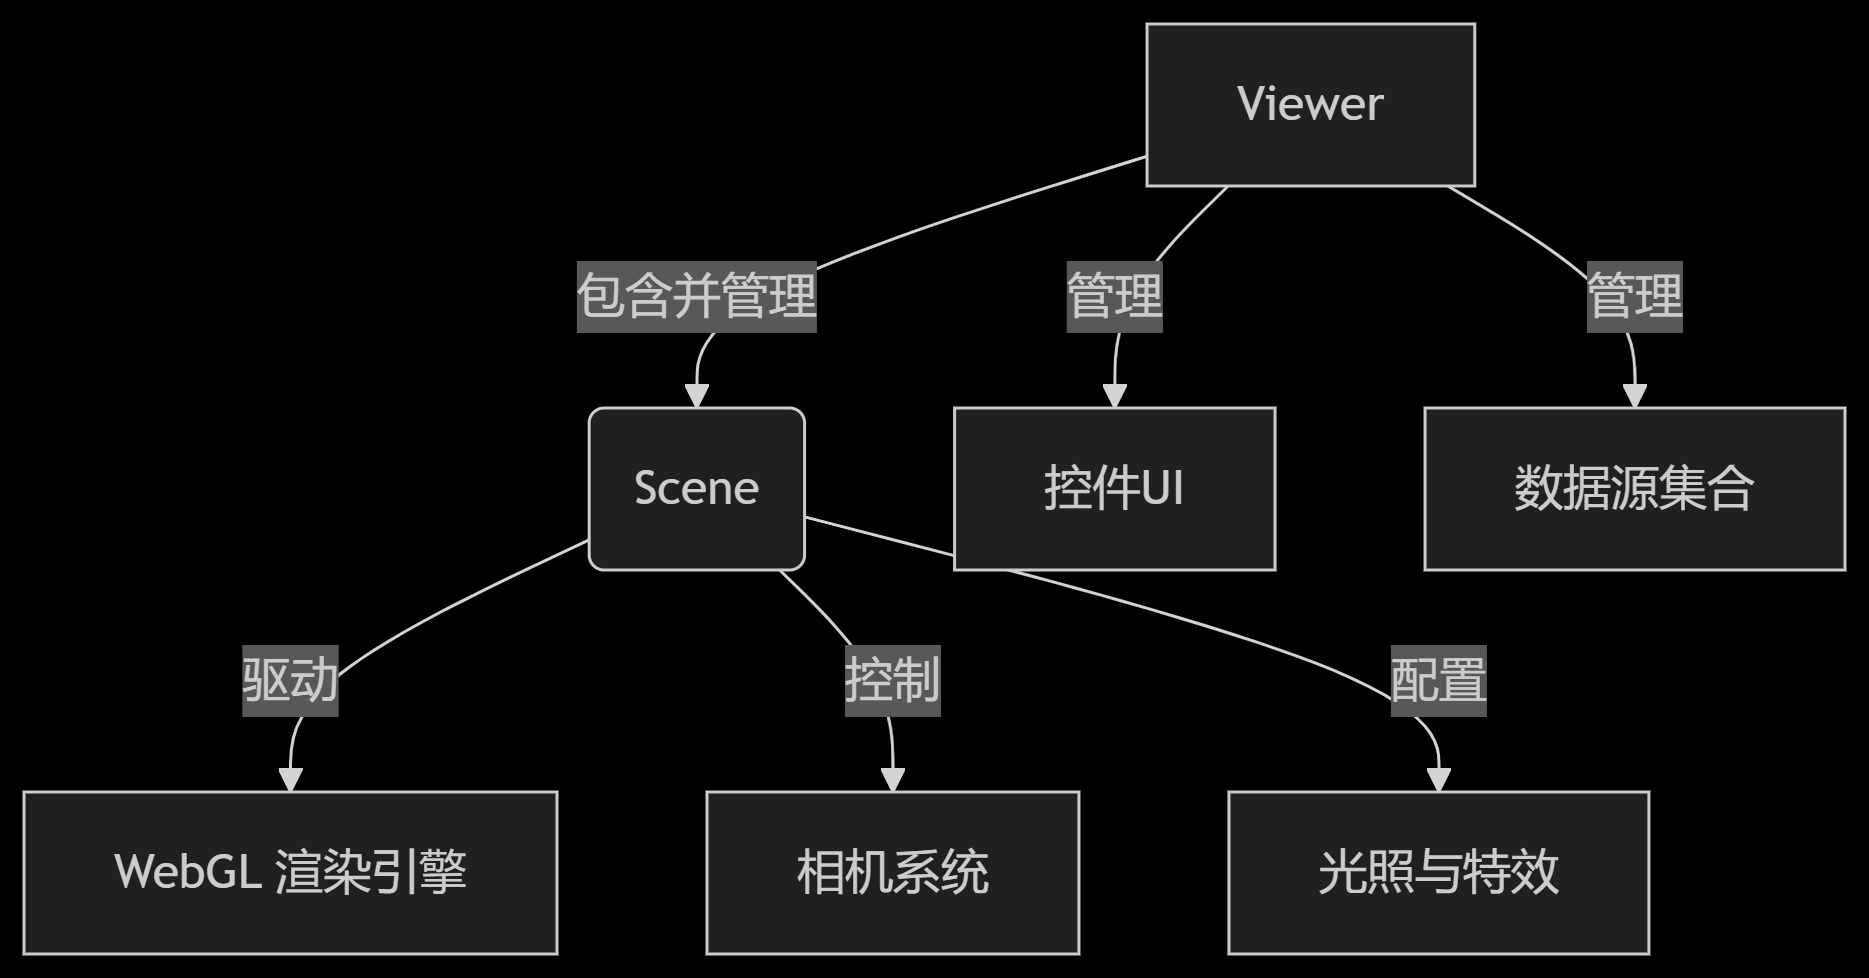
Viewer 与 Scene 和 Camera 的关系
Viewer 是 Cesium 的核心类,包含 Scene 和 CameraScene 是渲染场景的核心对象,包含 Globe、Primitive、Entity 等Camera 控制场景视角,是 Scene 的一部分
创建 Viewer 实例
const viewer = new Cesium.Viewer(container, options);参数说明
| 参数名 | 类型 | 描述 | 是否必需 |
|---|---|---|---|
container | HTMLElement | string | 用于承载 Cesium 场景的 HTML 容器元素或其 ID | 是 |
options | Object | 配置 Viewer 行为和外观的选项对象 | 否 |
核心特性
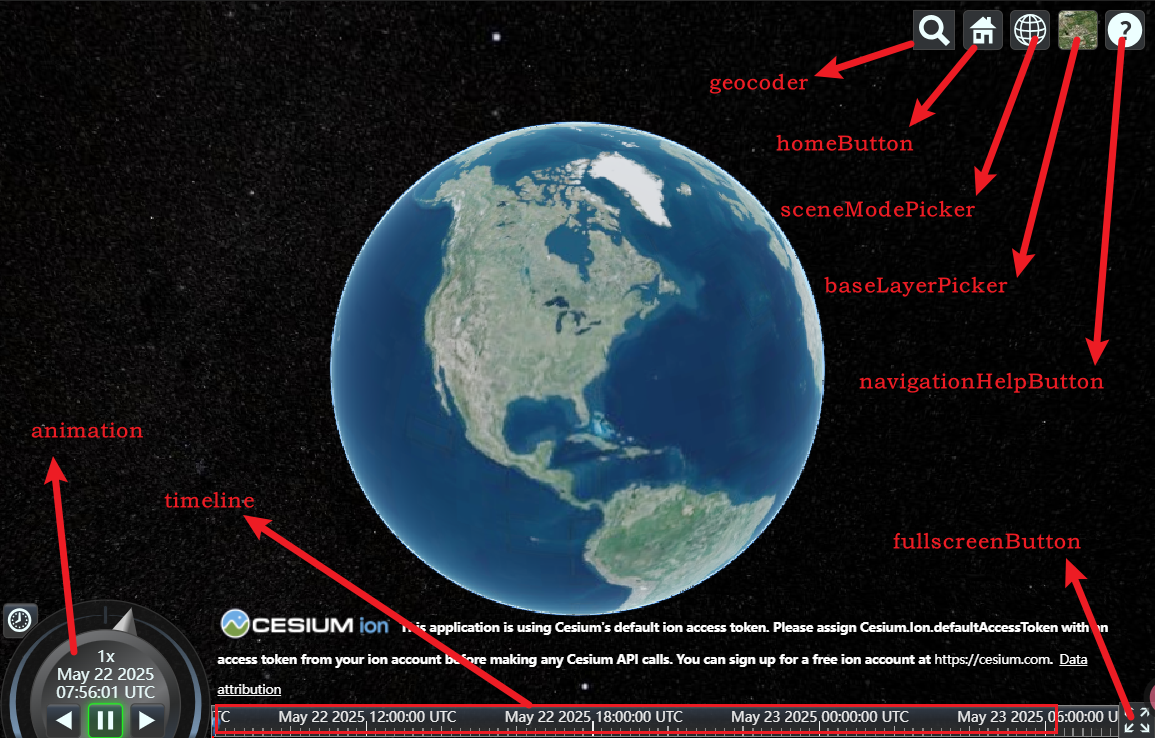
集成控件系统
Viewer 默认集成了多种交互控件,可通过 options 参数灵活配置显示状态:
控件配置
| 控件名称 | 描述 | 默认值 | 用途场景 |
|---|---|---|---|
geocoder | 地理编码搜索框 | true | 快速定位到指定地理位置 |
homeButton | 主页按钮 | true | 重置相机到初始视角 |
sceneModePicker | 场景模式选择器 | true | 切换 2D/3D/哥伦布视图 |
baseLayerPicker | 底图选择器 | true | 切换不同的底图图层 |
navigationHelpButton | 导航帮助按钮 | true | 显示相机控制说明 |
animation | 动画控件 | true | 控制时间轴动画播放 |
timeline | 时间轴控件 | true | 可视化和控制时间维度 |
fullscreenButton | 全屏按钮 | true | 切换场景全屏显示 |
vrButton | VR 按钮 | false | 启用 VR 模式(需硬件支持) |
infoBox | 信息框 | true | 显示选中实体的详情信息 |
selectionIndicator | 选择指示器 | true | 显示实体选中状态标记 |
控件配置示例:创建极简 Viewer(无默认控件)
const viewer = new Cesium.Viewer(cesiumContainer.value, {
  geocoder: false, // 关闭地理编码搜索
  homeButton: false, // 关闭主页按钮
  sceneModePicker: false, // 关闭场景模式选择器
  baseLayerPicker: false, // 关闭底图选择器
  navigationHelpButton: false, // 关闭导航帮助
  animation: false, // 关闭动画控件
  timeline: false, // 关闭时间轴
  fullscreenButton: false, // 关闭全屏按钮
});
隐藏 logo
Cesium Logo 是通过 CSS 控制其显示状态的
viewer.cesiumWidget.creditContainer.style.display = "none";完整代码
这里加载的天地图,注意需要关闭默认底图加载,baseLayer: false,
展开代码
<template>
  <div ref="cesiumContainer" class="container"></div>
</template>

<script setup>
import { ref, onMounted } from "vue";
import * as Cesium from "cesium";
const cesiumContainer = ref(null);
let viewer = null;

// 天地图TOKEN
const token = "05be06461004055923091de7f3e51aa6";

onMounted(() => {
  // 初始化Viewer
  viewer = new Cesium.Viewer(cesiumContainer.value, {
    geocoder: false, // 关闭地理编码搜索
    homeButton: false, // 关闭主页按钮
    sceneModePicker: false, // 关闭场景模式选择器
    baseLayerPicker: false, // 关闭底图选择器
    navigationHelpButton: false, // 关闭导航帮助
    animation: false, // 关闭动画控件
    timeline: false, // 关闭时间轴
    fullscreenButton: false, // 关闭全屏按钮
    baseLayer: false, // 关闭默认地图
  });
  // 清空logo
  viewer.cesiumWidget.creditContainer.style.display = "none";
  initMap();
});

// 加载天地图
const initMap = () => {
  // 以下为天地图及天地图标注加载
  const tiandituProvider = new Cesium.WebMapTileServiceImageryProvider({
    url:
      "http://{s}.tianditu.gov.cn/img_w/wmts?service=wmts&request=GetTile&version=1.0.0&LAYER=img&tileMatrixSet=w&TileMatrix={TileMatrix}&TileRow={TileRow}&TileCol={TileCol}&style=default&format=tiles&tk=" +
      token,
    layer: "img",
    style: "default",
    format: "tiles",
    tileMatrixSetID: "w",
    subdomains: ["t0", "t1", "t2", "t3", "t4", "t5", "t6", "t7"], // 子域名
    maximumLevel: 18,
    credit: new Cesium.Credit("天地图影像"),
  });
  // 天地图影像添加到viewer实例的影像图层集合中
  viewer.imageryLayers.addImageryProvider(tiandituProvider);
};
</script>
<style scoped>
.container {
  width: 100vw;
  height: 100vh;
}
</style>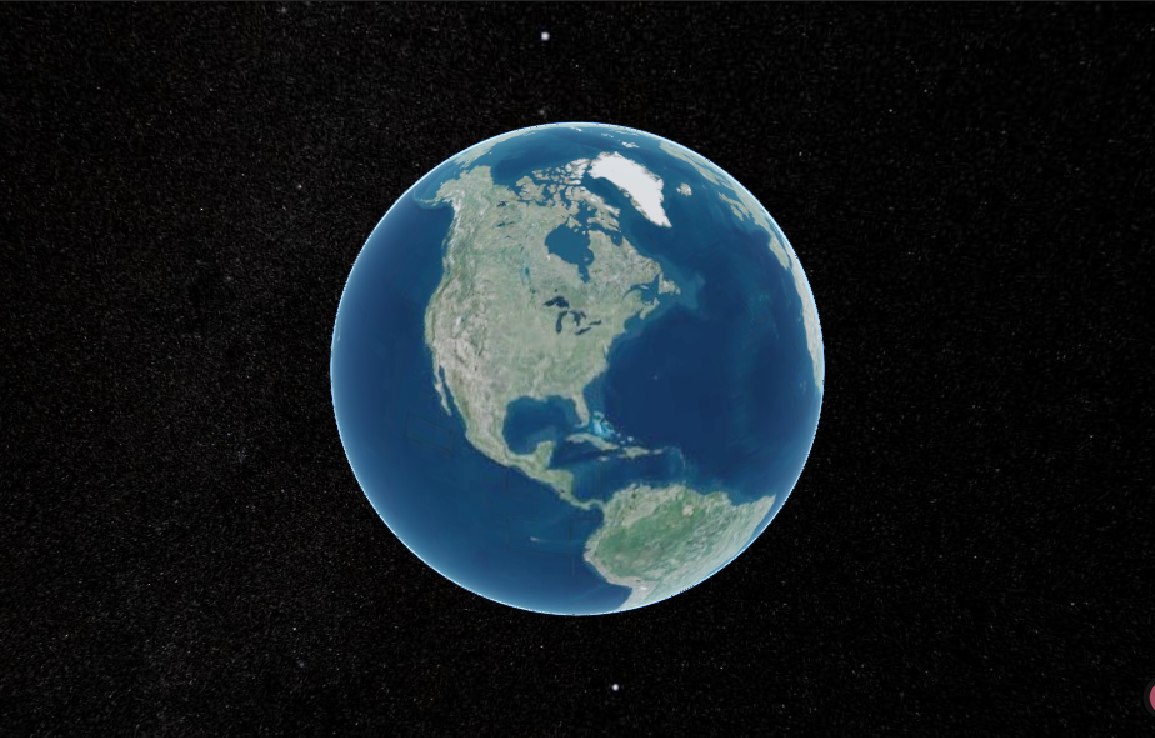
更多配置项
| 配置项 | 描述 | 默认值 |
|---|---|---|
baseLayer | 底图提供者,用于加载地图图层 | ImageryLayer.fromWorldImagery() |
globe | 地球配置,用于控制地球显示 | new Globe(options.ellipsoid) |
terrainProvider | 地形提供者,用于加载地形数据 | new EllipsoidTerrainProvider() |
shouldAnimate | 是否启用动画播放(如时间轴) | false |
sceneMode | 场景模式(SCENE2D、SCENE3D、COLUMBUS_VIEW、MORPHING) | SceneMode.SCENE3D |
mapProjection | 地图投影配置,用于控制地图坐标系统 | new GeographicProjection(options.ellipsoid) |
skyBox | 天空盒配置,用于自定义天空背景 | |
skyAtmosphere | 是否启用大气层效果 | |
contextOptions | WebGL 上下文配置选项,用于定制渲染管线 | |
useDefaultRenderLoop | 是否使用默认渲染循环 | true |
Scene 场景管理核心(viewer.scene)
Scene 是 Cesium 虚拟场景中所有 3D 图形对象和状态的容器,通常不直接创建,而是由 CesiumWidget 隐式创建。它负责管理场景中的所有元素,包括地球、地形、模型、实体等,同时处理光照、阴影、大气效果等渲染相关属性。
初始化配置
Scene 的初始化配置主要通过构造函数参数实现:
const scene = new Cesium.Scene({
  canvas: canvas, // HTML canvas 元素
  contextOptions: {
    // WebGL 上下文属性
    webgl: {
      alpha: false, // 默认 false,设置为 true 可实现 alpha 混合
      antialias: true, // 抗锯齿
      depth: true, // 深度测试
      stencil: false,
    },
    allowTextureFilterAnisotropic: true, // 各向异性纹理过滤
  },
  mapProjection: new Cesium.GeographicProjection(), // 2D 和 Columbus 视图的地图投影
  orderIndependentTranslucency: true, // 顺序无关的半透明性
  scene3DOnly: false, // 是否仅优化 3D 模式性能
  shadows: false, // 是否启用太阳阴影
  mapMode2D: Cesium.MapMode2D.INFINITE_SCROLL, // 2D 地图模式
  requestRenderMode: false, // 是否启用按需渲染
  maximumRenderTimeChange: 0.0, // 最大渲染时间变化
});
关键参数说明:
webgl.alpha: 默认为 false,设置为 true 可将 Cesium 合成在其他 HTML 元素上方,但会降低性能allowTextureFilterAnisotropic: 默认为 true,启用各向异性纹理过滤,提高视觉质量scene3DOnly: 设置为 true 可优化 3D 模式内存使用和性能,但禁用 2D 和 Columbus 视图requestRenderMode: 启用后仅在场景变化时渲染,提高性能
地球显示控制
// 隐藏地球
viewer.scene.globe.show = false;
场景模式切换
支持三种场景模式平滑过渡,过渡时间单位为秒:
// 切换到2D模式
viewer.scene.morphTo2D(1.5); // 1.5秒过渡动画

// 切换到3D模式
viewer.scene.morphTo3D(1.5);

// 切换到哥伦布视图(2.5D)
viewer.scene.morphToColumbusView(1.5);
天空与背景定制
CesiumJS 默认使用星系背景作为天空盒。您可以自定义背景颜色或更换为自定义的天空盒图片。
纯色背景
需要先将天空盒关闭,再通过viewer.scene.backgroundColor设置背景颜色:
const viewer = new Cesium.Viewer(cesiumContainer.value, {
  skyBox: false, // 方式一:在Viewer初始化选项中关闭天空盒
});

// viewer.scene.skyBox.show = false; // 方式二:在Viewer初始化后关闭天空盒

// 设置场景背景颜色为天空蓝
viewer.scene.backgroundColor = Cesium.Color.SKYBLUE;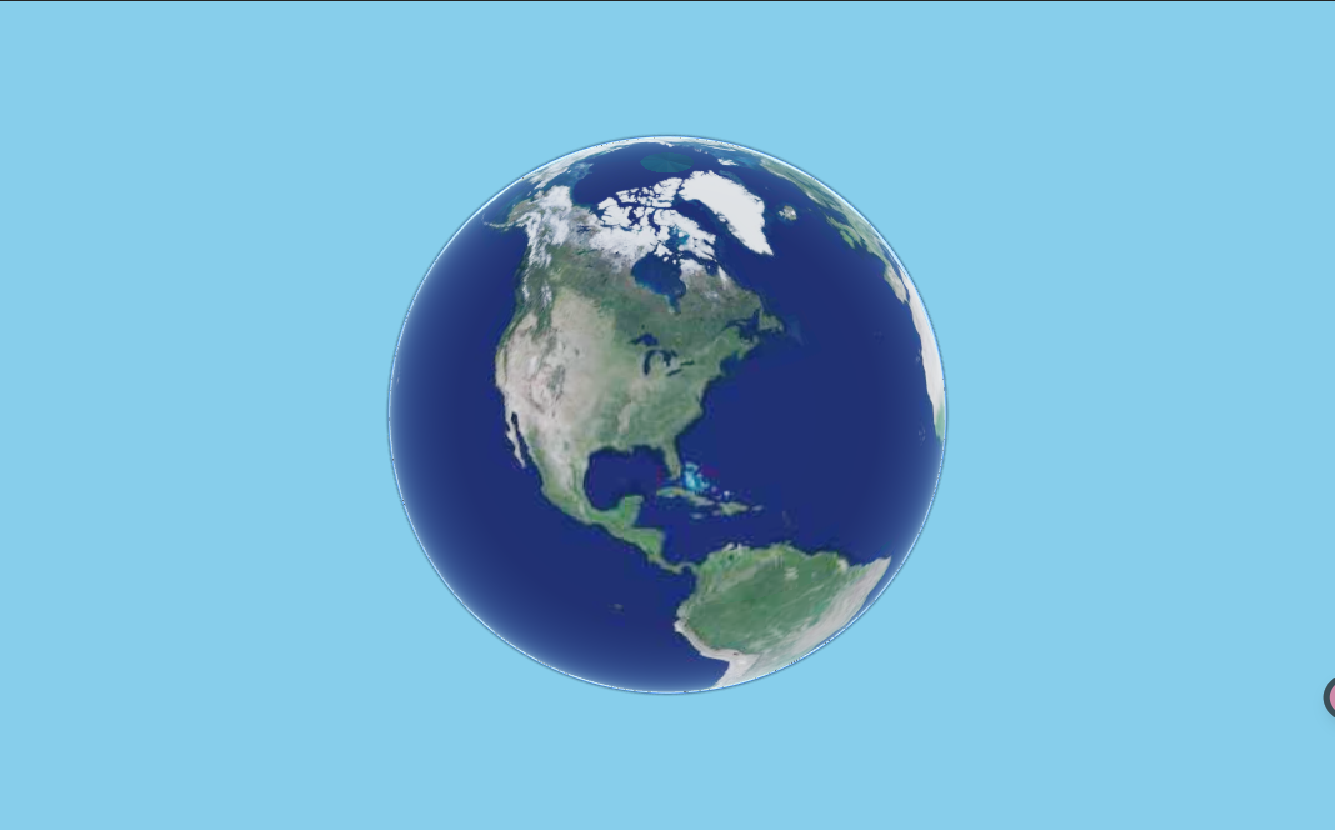
自定义天空盒
实现步骤:
- 准备 6 张立方体贴图(正 X/负 X/正 Y/负 Y/正 Z/负 Z)
- 通过
SkyBox类加载应用
展开代码
<template>
  <div ref="cesiumContainer" class="container"></div>
</template>

<script setup>
import { ref, onMounted } from "vue";
import * as Cesium from "cesium";
import mx from "./skyBox/tycho2t3_80_mx.jpg";
import my from "./skyBox/tycho2t3_80_my.jpg";
import mz from "./skyBox/tycho2t3_80_mz.jpg";
import px from "./skyBox/tycho2t3_80_px.jpg";
import py from "./skyBox/tycho2t3_80_py.jpg";
import pz from "./skyBox/tycho2t3_80_pz.jpg";
const cesiumContainer = ref(null);
let viewer = null;

// 天地图TOKEN
const token = "05be06461004055923091de7f3e51aa6";

onMounted(() => {
  // 初始化Viewer
  viewer = new Cesium.Viewer(cesiumContainer.value, {
    geocoder: false, // 关闭地理编码搜索
    homeButton: false, // 关闭主页按钮
    sceneModePicker: false, // 关闭场景模式选择器
    baseLayerPicker: false, // 关闭底图选择器
    navigationHelpButton: false, // 关闭导航帮助
    animation: false, // 关闭动画控件
    timeline: false, // 关闭时间轴
    fullscreenButton: false, // 关闭全屏按钮
    baseLayer: false, // 关闭默认地图
  });
  // 清空logo
  viewer.cesiumWidget.creditContainer.style.display = "none";

  // 设置天空盒
  viewer.scene.skyBox = new Cesium.SkyBox({
    sources: {
      positiveX: mx,
      negativeX: px,
      positiveY: my,
      negativeY: py,
      positiveZ: mz,
      negativeZ: pz,
    },
  });
  initMap();
});

// 加载天地图
const initMap = () => {
  // 以下为天地图及天地图标注加载
  const tiandituProvider = new Cesium.WebMapTileServiceImageryProvider({
    url:
      "http://{s}.tianditu.gov.cn/img_w/wmts?service=wmts&request=GetTile&version=1.0.0&LAYER=img&tileMatrixSet=w&TileMatrix={TileMatrix}&TileRow={TileRow}&TileCol={TileCol}&style=default&format=tiles&tk=" +
      token,
    layer: "img",
    style: "default",
    format: "tiles",
    tileMatrixSetID: "w",
    subdomains: ["t0", "t1", "t2", "t3", "t4", "t5", "t6", "t7"], // 子域名
    maximumLevel: 18,
    credit: new Cesium.Credit("天地图影像"),
  });
  // 天地图影像添加到viewer实例的影像图层集合中
  viewer.imageryLayers.addImageryProvider(tiandituProvider);
};
</script>
<style scoped>
.container {
  width: 100vw;
  height: 100vh;
}
</style>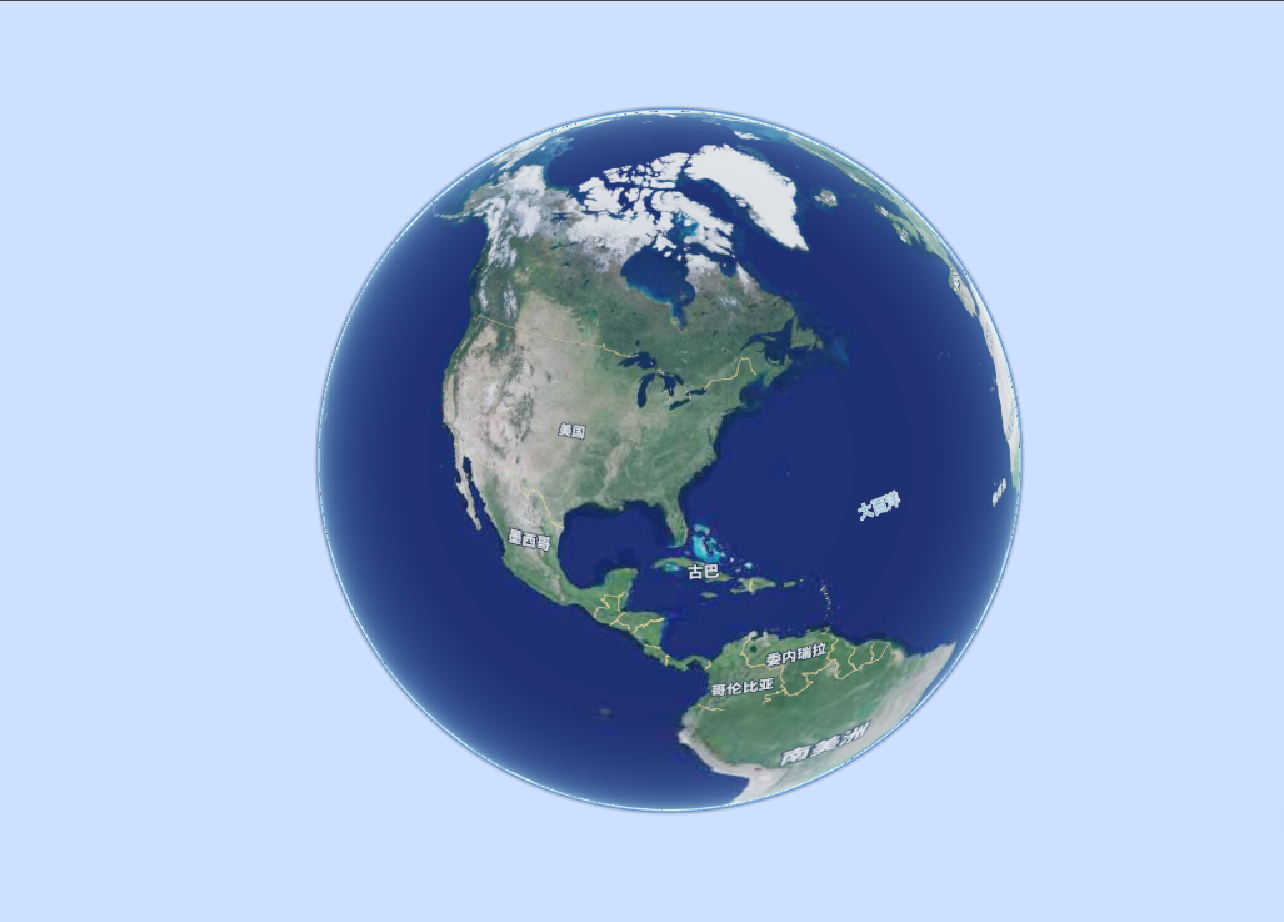
大气层控制
// 关闭大气层(方式一)
viewer.scene.skyAtmosphere.show = false;

// 关闭大气层(方式二)
const viewer = new Cesium.Viewer(cesiumContainer.value, {
  skyAtmosphere: false,
});

// 调整大气层亮度
viewer.scene.skyAtmosphere.brightnessShift = 0.5; // 默认0
viewer.scene.skyAtmosphere.hueShift = 0.1; // 色调偏移
viewer.scene.skyAtmosphere.saturationShift = -0.2; // 饱和度偏移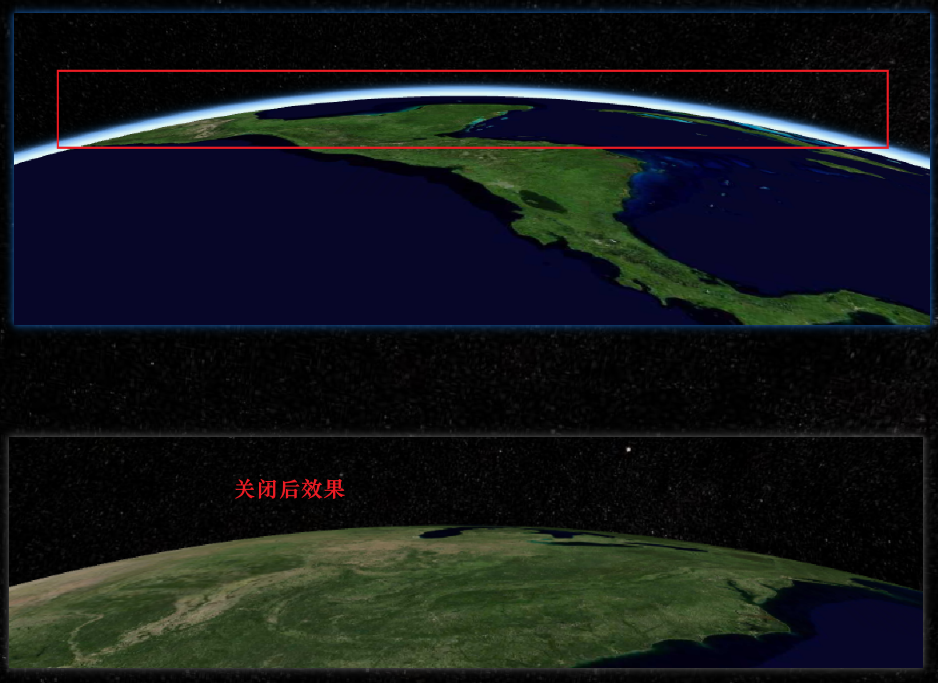
光照控制
// 启用环境光遮蔽
viewer.scene.globe.enableLighting = true;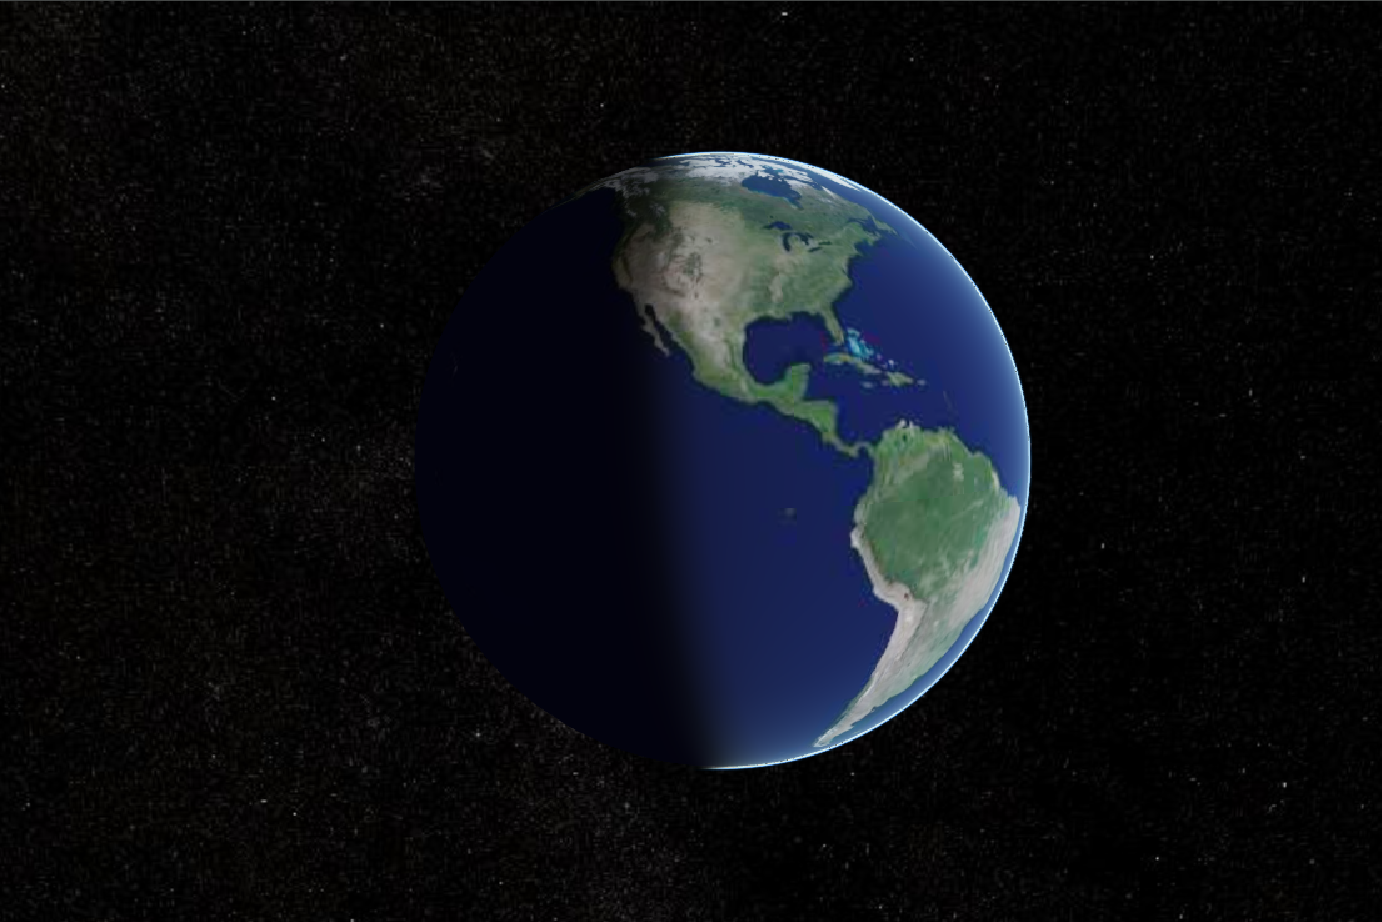
性能监控
// 显示帧率(FPS)
viewer.scene.debugShowFramesPerSecond = true;
添加气泡窗口
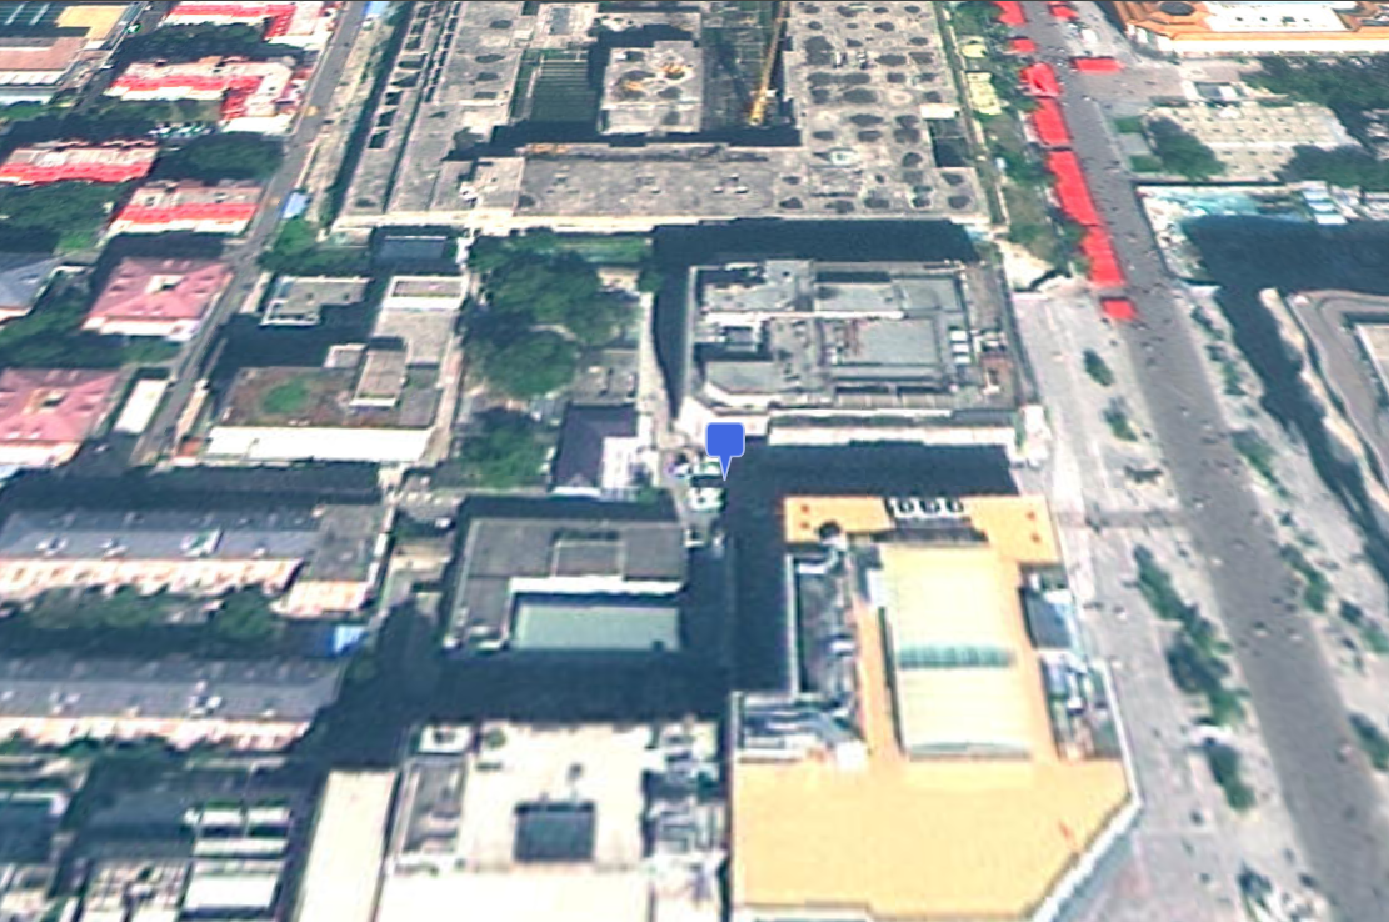
您可以在 CesiumJS 场景中叠加自定义的 HTML 元素,例如气泡窗口,并通过 JavaScript 控制其位置,使其始终跟随三维空间中的某个点。
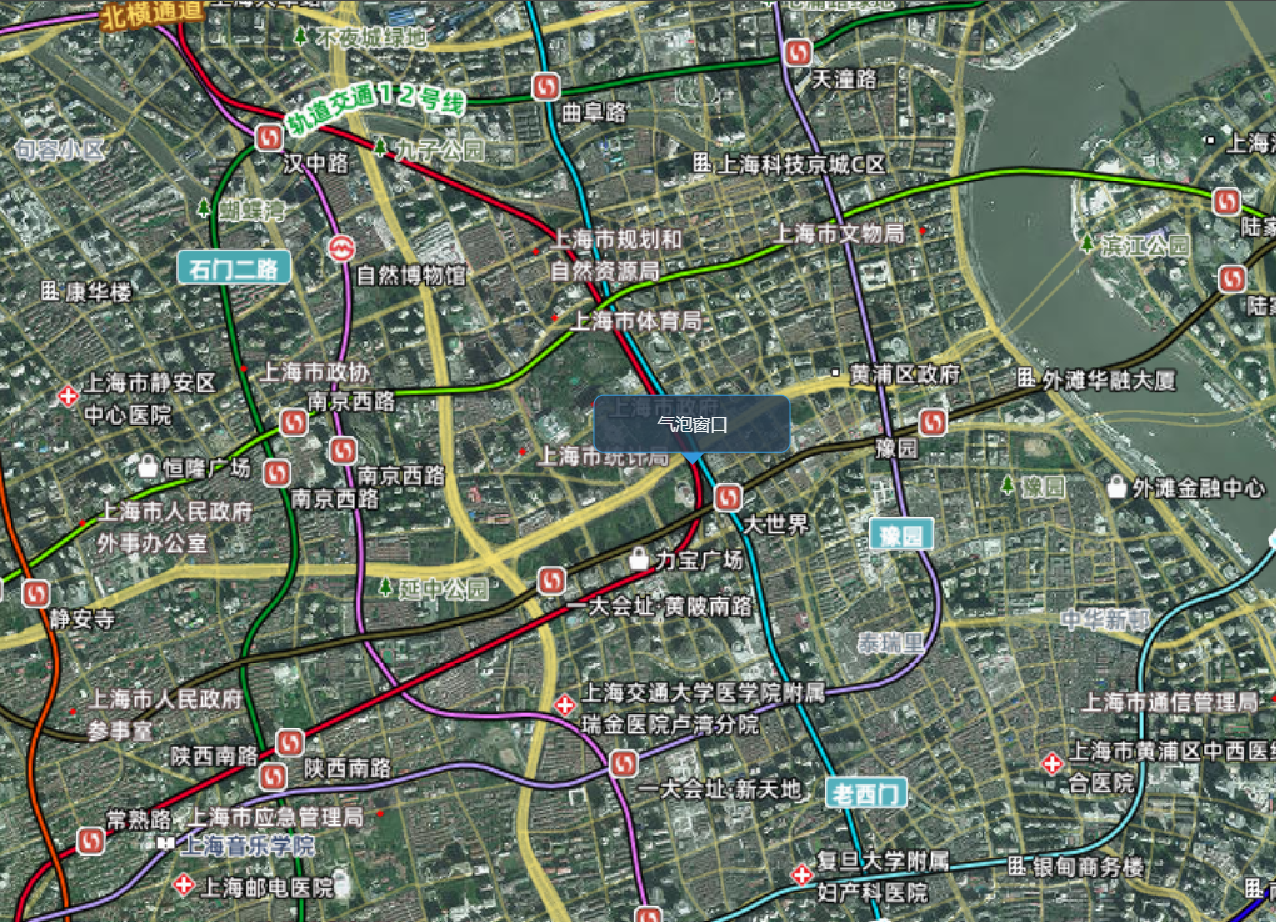
实现步骤:
- 创建 HTML 元素作为气泡窗口容器
- 使用
scene.cartesianToCanvasCoordinates将三维坐标转换为屏幕坐标 - 在
preRender事件中实时更新元素位置
展开代码
<template>
  <div ref="cesiumContainer" class="container"></div>
  <div ref="popup" class="popup-window">气泡窗口</div>
</template>

<script setup>
import { ref, onMounted } from "vue";
import * as Cesium from "cesium";

const cesiumContainer = ref(null);
const popup = ref(null);
let viewer = null;

// 天地图TOKEN
const token = "05be06461004055923091de7f3e51aa6";

onMounted(() => {
  // 初始化Viewer
  viewer = new Cesium.Viewer(cesiumContainer.value, {
    geocoder: false, // 关闭地理编码搜索
    homeButton: false, // 关闭主页按钮
    sceneModePicker: false, // 关闭场景模式选择器
    baseLayerPicker: false, // 关闭底图选择器
    navigationHelpButton: false, // 关闭导航帮助
    animation: false, // 关闭动画控件
    timeline: false, // 关闭时间轴
    fullscreenButton: false, // 关闭全屏按钮
    baseLayer: false, // 关闭默认地图
  });

  // 清空logo
  viewer.cesiumWidget.creditContainer.style.display = "none";

  // 设置相机视角
  viewer.camera.setView({
    destination: Cesium.Cartesian3.fromDegrees(121.4737, 31.2304, 5000),
    orientation: {
      heading: Cesium.Math.toRadians(0),
      pitch: Cesium.Math.toRadians(-90),
      roll: 0,
    },
  });

  // 添加preRender事件,使窗口位置保持不变
  viewer.scene.preRender.addEventListener(function () {
    const htmlPop = viewer.scene.cartesianToCanvasCoordinates(
      Cesium.Cartesian3.fromDegrees(121.4737, 31.2304, 0),
      new Cesium.Cartesian2()
    );
    if (popup.value && htmlPop) {
      popup.value.style.left = htmlPop.x + "px";
      popup.value.style.top = htmlPop.y + "px";
    }
  });

  initMap();
});

// 加载天地图
const initMap = () => {
  // 以下为天地图及天地图标注加载
  const tiandituProvider = new Cesium.WebMapTileServiceImageryProvider({
    url:
      "http://{s}.tianditu.gov.cn/img_w/wmts?service=wmts&request=GetTile&version=1.0.0&LAYER=img&tileMatrixSet=w&TileMatrix={TileMatrix}&TileRow={TileRow}&TileCol={TileCol}&style=default&format=tiles&tk=" +
      token,
    layer: "img",
    style: "default",
    format: "tiles",
    tileMatrixSetID: "w",
    subdomains: ["t0", "t1", "t2", "t3", "t4", "t5", "t6", "t7"], // 子域名
    maximumLevel: 18,
    credit: new Cesium.Credit("天地图影像"),
  });

  // 添加地理标注
  const labelProvider = new Cesium.WebMapTileServiceImageryProvider({
    url:
      "http://{s}.tianditu.gov.cn/cia_w/wmts?service=wmts&request=GetTile&version=1.0.0&LAYER=cia&tileMatrixSet=w&tileMatrix={TileMatrix}&tileRow={TileRow}&tileCol={TileCol}&style=default&format=tiles&tk=" +
      token,
    layer: "img",
    style: "default",
    format: "tiles",
    tileMatrixSetID: "w",
    subdomains: ["t0", "t1", "t2", "t3", "t4", "t5", "t6", "t7"], // 子域名轮询
    maximumLevel: 18,
    credit: new Cesium.Credit("天地图影像"),
  });

  // 天地图影像添加到viewer实例的影像图层集合中
  viewer.imageryLayers.addImageryProvider(tiandituProvider);
  // 天地图地理标注(后添加的会覆盖前面的)
  viewer.imageryLayers.addImageryProvider(labelProvider);
};
</script>
``
<style scoped>
.container {
  width: 100vw;
  height: 100vh;
}

.popup-window {
  position: absolute;
  padding: 12px 18px;
  background-color: rgba(44, 62, 80, 0.85);
  color: #ecf0f1;
  border: 1px solid #3498db;
  border-radius: 8px;
  box-shadow: 0 4px 12px rgba(0, 0, 0, 0.3);
  font-family: "Segoe UI", Tahoma, Geneva, Verdana, sans-serif;
  font-size: 14px;
  text-align: center;
  min-width: 120px;
  pointer-events: none;
  transform: translate(-50%, -100%);
}

.popup-window::after {
  content: "";
  position: absolute;
  bottom: -10px;
  left: 50%;
  transform: translateX(-50%);
  border-width: 10px 10px 0;
  border-style: solid;
  border-color: #3498db transparent transparent transparent;
  display: block;
  width: 0;
  height: 0;
}

.popup-window::before {
  content: "";
  position: absolute;
  bottom: -9px;
  left: 50%;
  transform: translateX(-50%);
  border-width: 9px 9px 0;
  border-style: solid;
  border-color: rgba(44, 62, 80, 0.85) transparent transparent transparent;
  display: block;
  width: 0;
  height: 0;
}
</style>
API 补充说明:
viewer.scene.cartesianToCanvasCoordinates(cartesian, result): 将三维笛卡尔坐标转换为屏幕二维坐标viewer.scene.preRender.addEventListener(callback): 场景渲染前触发的事件,用于实时更新 UICesium.Cartesian3.fromDegrees(longitude, latitude, height): 从经纬度创建三维坐标
实体添加(entity)、GeoJson 数据添加
CesiumJS 通过实体(Entity)概念来表示场景中的各种对象,如点、线、面、模型等。同时,它也支持直接加载 GeoJSON 数据。
实体添加:
这里提供一个简单的实体示例,介绍配置项中的选择指示器selectionIndicator和信息框infoBox。详细实体介绍参考实体类型。
const rectangle = viewer.entities.add({
  rectangle: {
    coordinates: Cesium.Rectangle.fromDegrees(
      116.3975, // 西经度
      39.9075, // 南纬度
      116.4075, // 东经度
      39.9175 // 北纬度
    ),
    material: Cesium.Color.RED.withAlpha(0.5), // 半透明红色材质
  },
});

viewer.zoomTo(rectangle); // 将相机视角缩放到该矩形实体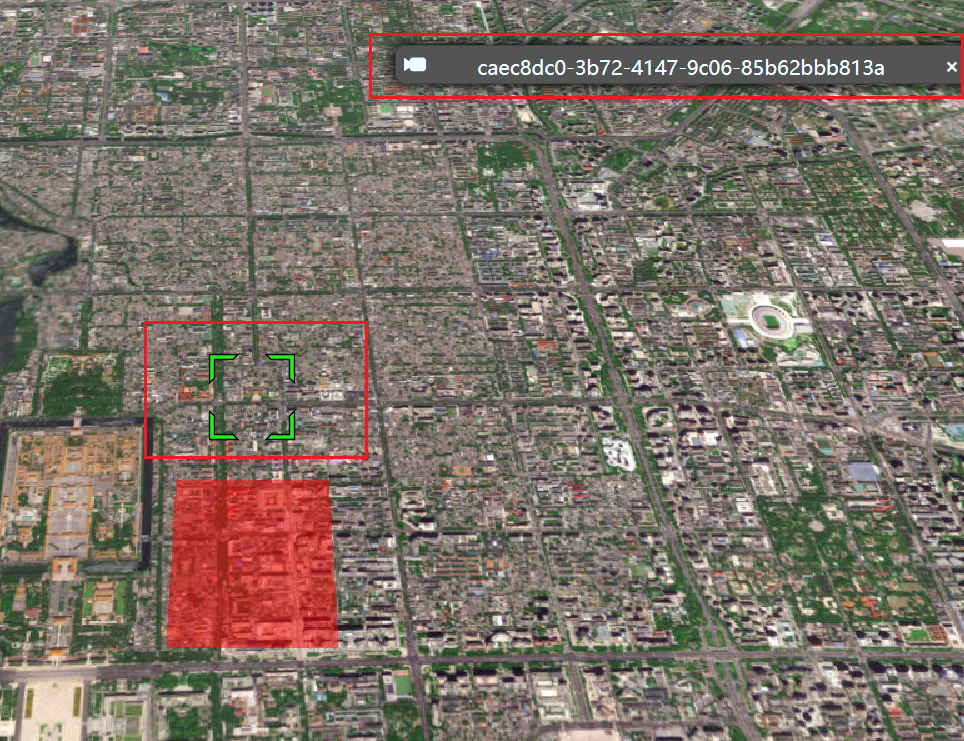
点击实体会出现标识控件和提示框,可通过设置selectionIndicator和infoBox为false来关闭:
new Cesium.Viewer(cesiumContainer.value, {
  selectionIndicator: false, // 关闭选择指示器
  infoBox: false, // 关闭信息框
});
GeoJson 数据添加:
GeoJson 是一种用于描述地理空间数据的开放标准,支持点、线、面等几何对象。以下为一个简单的 GeoJson 示例,更多可参考数据加载。
// 模拟一个GeoJson数据
const geojson = {
  type: "FeatureCollection",
  features: [
    {
      type: "Feature",
      properties: {
        name: "City A",
      },
      geometry: {
        type: "Point",
        coordinates: [116.404, 39.915],
      },
    },
  ],
};

// 加载GeoJson数据
const dataSource = await Cesium.GeoJsonDataSource.load(geojson);
viewer.dataSources.add(dataSource);
viewer.flyTo(dataSource);注意:
GeoJsonDataSource.load是异步方法,需使用await或.then()处理。
地形可视化
Cesium 支持加载全球地形数据和自定义地形数据,实现真实地貌展示。
默认全球地形
const viewer = new Cesium.Viewer("cesiumContainer", {
  terrainProvider: await Cesium.createWorldTerrainAsync({
    requestVertexNormals: true, // 启用地形光照效果
    requestWaterMask: true, // 启用水面效果(海洋、湖泊)
  }),
});
本地地形
对于离线场景或自定义地形数据,可加载本地地形切片:
// 加载本地地形切片
const localTerrain = new Cesium.CesiumTerrainProvider({
  url: "./assets/terrain", // 本地地形数据路径
  requestVertexNormals: true, // 请求顶点法线
  requestWaterMask: true, // 请求水面遮罩
});

viewer.terrainProvider = localTerrain;
地形深度测试
开启地形深度测试可确保模型与地形正确遮挡:
// 开启地形深度测试
viewer.scene.globe.depthTestAgainstTerrain = true;
获取地形的高度
使用sampleTerrainMostDetailed方法获取指定位置的地形高度,该方法返回 Promise:
// 获取某一点的地形高度
const position = Cesium.Cartographic.fromDegrees(longitude, latitude);
const results = await Cesium.sampleTerrainMostDetailed(viewer.terrainProvider, [
position,
]);
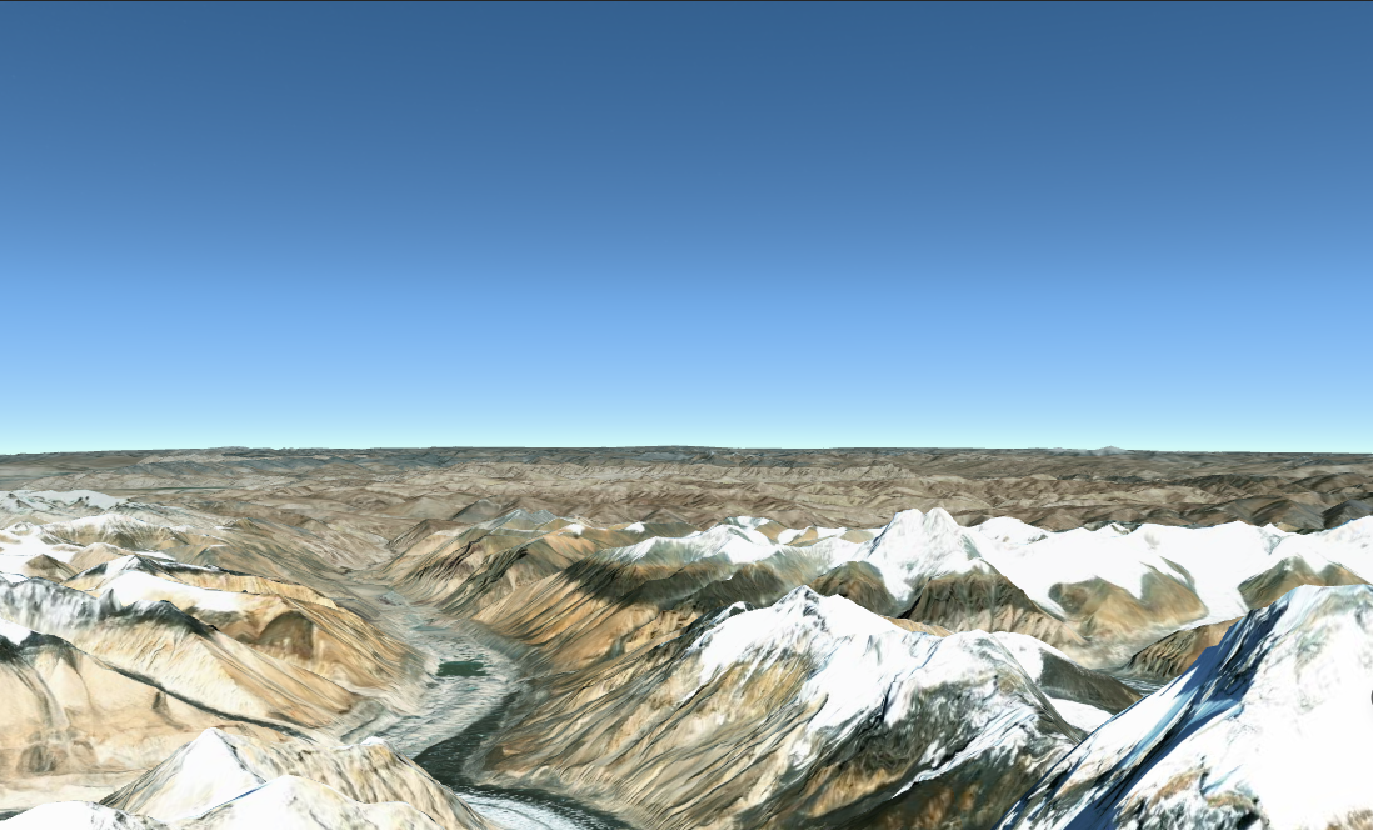
console.log(results[0].height); // 该点的地形高度(米)地形夸张
scene.verticalExaggeration 用于设置地形的垂直夸张比例,默认值为 1.0。调整该值可增强地形的视觉效果:
// 定位到珠穆朗玛峰附近
viewer.camera.setView({
  destination: Cesium.Cartesian3.fromDegrees(86.925, 27.9881, 15000), // 经度、纬度、高度
  orientation: {
    heading: Cesium.Math.toRadians(0), // 方位角
    pitch: Cesium.Math.toRadians(-90), // 俯仰角(-90度表示正上方俯视)
    roll: Cesium.Math.toRadians(0), // 翻滚角
  },
});

// 设置地形垂直夸张比例为4倍
viewer.scene.verticalExaggeration = 4;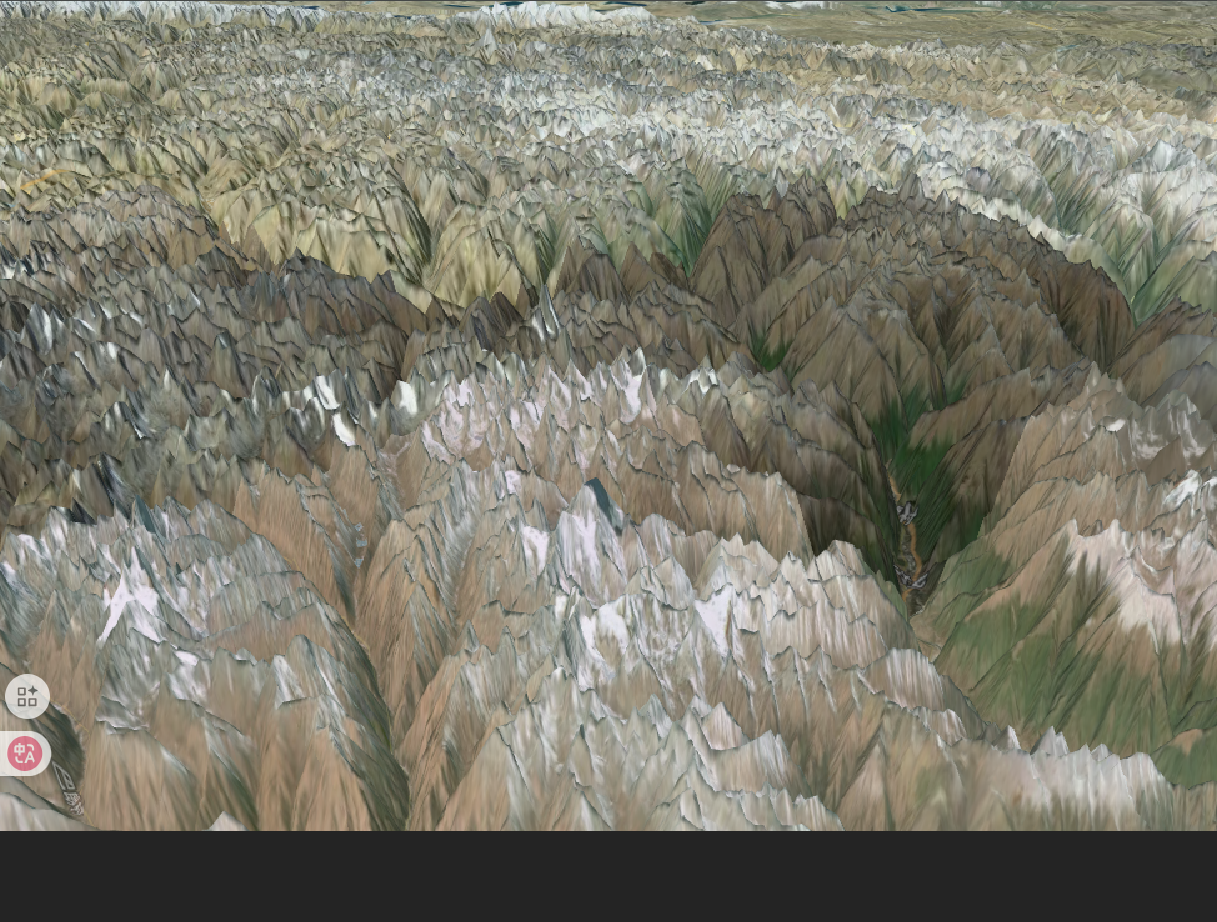
事件系统
Viewer 提供了丰富的事件接口,用于响应用户交互和场景变化:
// 监听相机移动结束事件
viewer.camera.changed.addEventListener(function () {
  const position = viewer.camera.positionCartographic;
  console.log(
    `相机位置: 经度${Cesium.Math.toDegrees(position.longitude).toFixed(
      4
    )}, 纬度${Cesium.Math.toDegrees(position.latitude).toFixed(
      4
    )}, 高度${position.height.toFixed(1)}米`
  );
});

// 监听场景渲染事件
viewer.scene.postRender.addEventListener(function () {
  // 每帧渲染后执行的逻辑
});
性能优化策略
- 对于大规模数据可视化,考虑使用
Primitive而非Entity以获得更好性能 - 合理设置
viewer.resolutionScale控制渲染分辨率 - 使用
viewer.scene.requestRenderMode = true启用按需渲染
- 实体批处理:对于大量实体,使用
Primitive统一管理
下面案例使用BillboardCollection和Primitive添加五万个图标,同时保证高性能渲染
点击查看代码
<template>
  <div ref="cesiumContainer" class="container"></div>
</template>

<script setup>
import { ref, onMounted } from "vue";
import * as Cesium from "cesium";
const cesiumContainer = ref(null);
let viewer = null;

// 天地图TOKEN
const token = "05be06461004055923091de7f3e51aa6";

onMounted(() => {
  // 初始化Viewer
  viewer = new Cesium.Viewer(cesiumContainer.value, {
    geocoder: false, // 关闭地理编码搜索
    homeButton: false, // 关闭主页按钮
    sceneModePicker: false, // 关闭场景模式选择器
    baseLayerPicker: false, // 关闭底图选择器
    navigationHelpButton: false, // 关闭导航帮助
    animation: false, // 关闭动画控件
    timeline: false, // 关闭时间轴
    fullscreenButton: false, // 关闭全屏按钮
    baseLayer: false, // 关闭默认地图
  });
  // 清空logo
  viewer.cesiumWidget.creditContainer.style.display = "none";
  initMap();

  // 添加大量广告牌集合
  const billboardCollection = viewer.scene.primitives.add(
    new Cesium.BillboardCollection()
  );
  for (let i = 0; i < 50000; i++) {
    billboardCollection.add({
      position: Cesium.Cartesian3.fromDegrees(
        Math.random() * 360 - 180, // 经度
        Math.random() * 180 - 90, // 纬度
        50
      ),
      image: "/src/assets/vue.svg", // 替换为实际图片路径
      width: 32,
      height: 32,
      scaleByDistance: new Cesium.NearFarScalar(10000, 1.0, 100000, 0.1), // 按距离缩放:避免远处图标浪费像素
    });
  }
});

// 加载天地图
const initMap = () => {
  // 以下为天地图及天地图标注加载
  const tiandituProvider = new Cesium.WebMapTileServiceImageryProvider({
    url:
      "http://{s}.tianditu.gov.cn/img_w/wmts?service=wmts&request=GetTile&version=1.0.0&LAYER=img&tileMatrixSet=w&TileMatrix={TileMatrix}&TileRow={TileRow}&TileCol={TileCol}&style=default&format=tiles&tk=" +
      token,
    layer: "img",
    style: "default",
    format: "tiles",
    tileMatrixSetID: "w",
    subdomains: ["t0", "t1", "t2", "t3", "t4", "t5", "t6", "t7"], // 子域名
    maximumLevel: 18,
    credit: new Cesium.Credit("天地图影像"),
  });
  // 天地图影像添加到viewer实例的影像图层集合中
  viewer.imageryLayers.addImageryProvider(tiandituProvider);
};
</script>
<style scoped>
.container {
  width: 100vw;
  height: 100vh;
}
</style>
- 按需渲染:启用请求渲染模式减少不必要的渲染
viewer.scene.requestRenderMode = true;
viewer.scene.maximumRenderTimeChange = 0.2; // 渲染间隔(秒)
图层管理最佳实践
问题背景
在 Cesium 中切换地图图层时,常见的错误做法是使用viewer.imageryLayers.removeAll()移除现有图层,然后添加新图层。这种方式会导致图层对象被销毁,当再次尝试使用这些对象时会抛出"This object was destroyed"错误。
推荐方案:控制图层显隐而非移除
通过控制图层的show属性来切换显示状态,避免对象销毁问题:
- 统一存储结构:使用数组存储不同类型的图层
- 初始加载所有图层:一次性添加所有图层到 viewer,但默认隐藏
- 切换时控制显隐:通过修改
show属性切换图层显示状态
案例详见添加底图中的综合案例
优势
- 避免对象销毁错误:图层始终存在于 viewer 中,不会被销毁
- 提升切换性能:无需重新创建图层对象和加载资源
- 简化逻辑:统一的显隐控制方式,易于维护和扩展
- 支持复杂图层组合:可同时显示多个地图类型的图层(如叠加不同数据源)
Viewer 生命周期管理
销毁与资源释放
当不再需要 Viewer 实例时,应正确销毁以释放 WebGL 资源:
// 在页面卸载时调用
function destroyViewer() {
  if (viewer) {
    viewer.destroy();
    viewer = null;
    console.log("Viewer实例已销毁");
  }
}
常用方法速查表
| 方法 | 描述 |
|---|---|
zoomTo(target, offset) | 相机自动调整到指定实体的视野 |
viewer.zoomTo(viewer.entities) | 缩放到所有实体 |
flyTo(target, options) | 相机平滑过渡到指定实体的位置 |
camera.setView(options) | 立即设置相机位置 |
camera.flyTo(options) | 相机平滑过渡到指定位置(与viewer.flyTo的区别在于直接操作相机) |
trackedEntity | 锁定相机视角跟随实体移动(适合动态目标跟踪) |
entities.add() | 添加实体到场景 |
scene.pick(position) | 根据屏幕坐标拾取场景中的实体 |
destroy() | 销毁 Viewer 实例,释放资源 |
dataSources.add(source) | 添加数据源(如 GeoJSON)到场景 |
dataSources.remove(source) | 从场景中移除数据源 |
clock.onTick.addEventListener() | 监听时间轴变化事件 |